Home Blog Page 2

Easy Slow Cooker Bread

0
Slow cooker Bread

Easy Slow cooker Bread: In today’s world, where space is at a premium and every inch counts, it’s not uncommon to find people struggling with a lack of storage space in their homes. One of the places where this problem is most acute is the kitchen, which is often the heart of the home and the place where families come together to prepare and enjoy meals. But what do you do when you don’t have enough space in your kitchen for all the appliances you want?

One solution that has become increasingly popular in recent years is slow cooker bread. This simple and delicious recipe allows you to make bread without the need for a bulky bread machine. All you need is a slow cooker, some basic ingredients, and a little bit of patience.

Slow-cooker bread is an excellent option for people who are short on space or who want to simplify their baking routine. Unlike traditional bread-making methods, which require a lot of hands-on time and attention, slow cooker bread is relatively hands-off. Once you mix the dough, you simply place it in the slow cooker and let it cook for a few hours.

The end result is a delicious and hearty loaf of bread that is perfect for sandwiches, toast, or just snacking on throughout the day. And because you don’t need a bread machine, you can make slow cooker bread even if you live in a small apartment or have a tiny kitchen.

In conclusion, slow cooker bread is a fantastic alternative to traditional bread-making methods that can save you space, time, and effort in the kitchen. If you’re a slow cooker user looking to try something new, we highly recommend giving this recipe a try. Your taste buds (and your kitchen) will thank you!

Ingredients:

  • 1/2 cup warm water
  • 2 cups of warm milk
  • 2 Tbsp melted UNSALTED butter
  • 1-3 tablespoons of sugar (add more if you like sweeter bread)
  • 3 tablespoons of active dry yeast (conservative side)
  • 6 cups of whole wheat flour (or 3 cups whole wheat & 3 cups all-purpose flour)
  • 2 teaspoons of salt
  • 1 teaspoon of baking powder

Instructions:

1 ) Grab a big bowl, and stir the 1/2 cup of warm water, 1 (or more) tablespoons of sugar, 3 tablespoons of yeast. Wait for 5 minutes (no longer – mine went all over the place the first time!) – it should be frothy on the top. While you’re waiting warm 2 cups of milk and 2 Tbsp of butter in the microwave.

2 ) Add milk and butter to yeast mixture. Using a standing mixer slowly add the 6 cups of flour, 2 teaspoons of salt, and 1 teaspoon of baking powder. Mix and knead the dough. (I used a dough hook once I had incorporated most of the flour for about 5 minutes then kneaded by hand for another 5-7 minutes.)

3 ) Line your slow cooker with cooking (baking) paper and place in your round ball of dough. I will rise in the slow cooker as it heats through. Cook on High power for 2- 2.5 hours. Start checking at every 7-10 minutes until top is sponge-y but springs back and no moisture on the top. The bottom should be a nice brown colour as well as sides.

I put mine (just the loaf) in the oven on broil/grill for less than 5 minutes to get a nice crusty top too!

NOTE: You can use a tea towel on top if you want to avoid condensation dripping in down on the loaf. I haven’t tried this myself – let me know how you go!

Use UNSALTED butter or adjust extra salt added!

Add MORE sugar if you want a sweet bread like in the shops.

If you can’t or are not skilled/practiced at kneading try the 50:50 ratio with whole wheat flour and all purpose flour, otherwise you will end up with a very dense loaf.

Make sure it is completely cooked through – my loaf took 2 1/2 hours!!
Slice and enjoy as whole grain toast or sandwich bread!


Morel Mushroom Hunting Tips

0
morel mushroom hunting tips

Morel mushrooms are highly sought after by mushroom hunters for their delicious flavor and meaty texture. However, finding these elusive mushrooms can be a challenge, even for experienced hunters. To increase your chances of success, it’s important to know when and where to look, use the right tools, and stay safe while you’re out in the woods. In this blog post, we’ll share some morel mushroom hunting tips to help you become a more successful hunter. Whether you’re a beginner or an experienced hunter, these tips will help you find morel mushrooms and enjoy the unique flavor they offer.


Know When and Where to Look

Morel mushrooms typically grow in the spring, usually in April and May, depending on the location and climate. They prefer moist, shaded areas with rich soil, such as riverbanks, forests, and wooded areas. To increase your chances of finding morels, plan your hunt during a warm, wet spell, and focus your search in areas with plenty of organic debris, such as fallen leaves and rotting logs.

Stay Safe

While morel mushroom hunting can be a fun and rewarding activity, it’s important to stay safe while you’re out in the woods. Wear appropriate clothing and footwear, and bring a first aid kit, insect repellent, and plenty of water. Be aware of your surroundings, and watch out for hazards such as uneven terrain, poisonous plants, and wildlife.

Use the Right Tools

To make your hunt more efficient, it’s important to use the right tools. A sturdy basket or bag is essential for carrying your harvest, and a small knife or scissors can help you cut the mushrooms off the stem cleanly. Many mushroom hunters also use a walking stick or trekking pole to help them navigate rough terrain and search for mushrooms in hard-to-reach areas. You can find the best mushroom scissors here.

Look for Signs of Morel Mushrooms

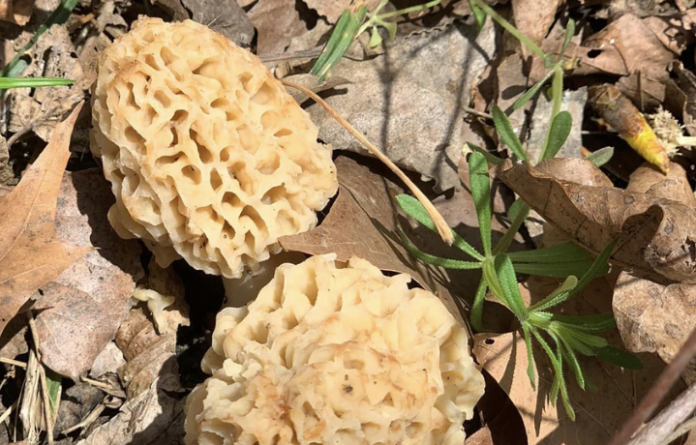
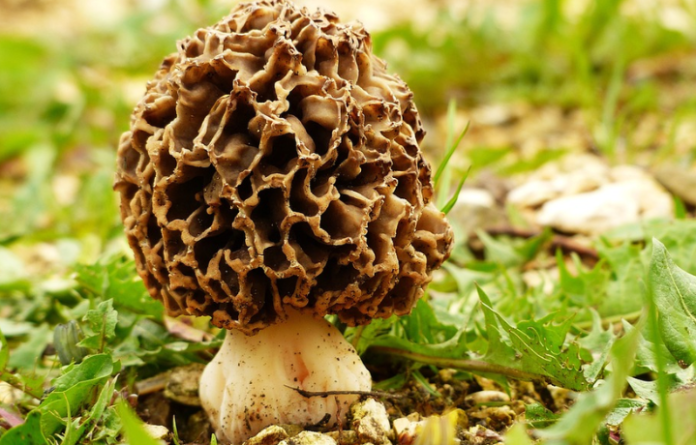
One of the keys to successful morel mushroom hunting is knowing what to look for. Morels are easily recognizable by their distinctive shape, which resembles a cone or honeycomb. They typically grow in clusters, and their color ranges from tan to brown. Look for areas where the soil is moist and rich in organic debris, such as under trees, near streams or rivers, or in damp areas of the forest.

Use Your Senses

Finding morel mushrooms is not just about looking for them; it’s also about using your senses. Morels have a distinct aroma that is often described as earthy or nutty. You can also use your sense of touch to find morels, as they have a unique texture that feels meaty and spongy. Additionally, morel mushrooms are often found near trees, so keep an eye out for areas where there are lots of fallen branches and leaves.

Be Patient and Persistent

Morel mushroom hunting can be a frustrating activity, as morels can be difficult to find. However, it’s important to be patient and persistent. Keep searching in different locations and habitats, and don’t give up if you don’t find any right away. Remember, the thrill of finding a rare morel mushroom is well worth the effort!

Learn from Other Mushroom Hunters

One of the best ways to improve your morel mushroom hunting skills is to learn from other hunters. Attend local mushroom hunting events and workshops, join online forums and groups, and talk to other hunters in your area. By sharing tips and strategies with other hunters, you can increase your knowledge and improve your chances of finding morels.

Cook and Enjoy Your Harvest

Once you’ve found your morel mushrooms, it’s time to cook and enjoy them! Morels are versatile mushrooms that can be sautéed, fried, grilled, or used in soups and stews. Before cooking, make sure to clean your morels thoroughly to remove any dirt or debris. You can also store morels in a paper bag in the refrigerator for up to a week, or freeze them for longer storage.

In conclusion, morel mushroom hunting can be a fun and rewarding activity for anyone with an

How to find morel mushrooms in Michigan

0

Michigan is a haven for mushroom hunters, especially during the spring season when the elusive morel mushrooms start popping up. Morel mushrooms are known for their distinctive honeycomb texture and earthy flavor, making them a prized delicacy among culinary enthusiasts. However, finding these mushrooms can be quite challenging, and it requires knowledge of their habitat and behaviors. In this article, we will provide a comprehensive guide on how to find morel mushrooms in Michigan.

Know the Right Time to Hunt for Morel Mushrooms

The timing of your morel mushroom hunting adventure is crucial. Morel mushrooms typically grow in the spring, and the ideal time to hunt them in Michigan is from mid-April to late May, depending on the weather conditions. Morel mushrooms prefer a combination of warm days and cool nights, followed by rain or moisture, to sprout.

Look for the Right Habitat

Morel mushrooms prefer specific types of soil and habitat to grow. They are often found in hardwood forests, especially those dominated by oak, ash, and elm trees. Morels also thrive in areas where the ground has been disturbed, such as burned or recently cleared forests, or along the banks of rivers and streams.

Pay Attention to the Weather Conditions

As mentioned earlier, morel mushrooms require specific weather conditions to grow. They thrive in moist environments, so you are likely to find them after a rainfall. The ideal time to go hunting for morel mushrooms is after a rainstorm, when the ground is moist, and the temperature is between 50-70 degrees Fahrenheit.

Use the Right Equipment

To increase your chances of finding morel mushrooms, you need to equip yourself with the right tools. A good pair of hiking boots, a hat, gloves, and a long-sleeved shirt are essential. You will also need a mesh bag or basket to carry the mushrooms and a knife to cut the stems. It’s crucial to use a sharp knife to avoid damaging the morel’s delicate stem.

Look for the Signs of Morel Mushrooms

Morel mushrooms are elusive and difficult to spot, but there are specific signs to look out for when hunting for them. One of the most reliable signs is to look for the trees mentioned earlier that are favored by morel mushrooms. Look for areas where the ground has been disturbed or where there are fallen trees or logs. Morels also tend to grow near dead or decaying trees, so keep an eye out for those as well.

Be Patient and Thorough

Morel mushroom hunting requires patience and persistence. You may have to cover a lot of ground before finding any mushrooms. Remember to look carefully and thoroughly at the ground, and don’t give up if you don’t find any right away. Morels can be hard to spot, and they may blend in with the forest floor or leaf litter.

Identify the Mushrooms

Once you have found some morel mushrooms, it’s essential to identify them correctly. There are several varieties of morel mushrooms, and some of them are poisonous. If you are unsure about the type of morel mushroom you have found, it’s best to consult an expert or avoid eating them altogether.

In conclusion, finding morel mushrooms in Michigan can be a fun and rewarding experience, but it requires patience, persistence, and knowledge of their habitat and behavior. By following these tips, you can increase your chances of finding morel mushrooms and enjoy their delicious earthy flavor in your favorite dishes. Remember to always be careful when identifying and consuming wild mushrooms, and enjoy your morel hunting adventure!

How To Find Morel Mushrooms In Kansas

0
How To Find Morel Mushrooms In Kansas

Mushroom hunting is an exciting and rewarding hobby for many nature enthusiasts, and the morel mushroom, in particular, is highly sought after for its unique flavor and meaty texture. While morel mushrooms can be found in many states throughout the United States, Kansas is one of the best places to go for morel mushroom hunting. In this article, we will provide you with all the information you need so that you’ll know How To Find Morel Mushrooms In Kansas.

Know When to Go, Mushroom Hunting,

Timing is crucial when it comes to finding morel mushrooms. In Kansas, morel mushrooms typically grow from mid-March to early May, depending on weather conditions. It’s important to keep an eye on the weather and look for warm, wet days, as these conditions are ideal for morel mushroom growth. You should also be on the lookout for sunny days that follow rainy days, as this can create the perfect environment for morel mushrooms to grow.

Find the Right Location

Knowing where to find morel mushrooms in Kansas is just as important as knowing when to look for them. Morel mushrooms grow in forests and wooded areas, so look for places where there are plenty of trees and shade. Kansas has many state parks and forests, as well as wildlife areas, where you can find morel mushrooms. Some of the best places to go mushroom hunting in Kansas include the Flint Hills, Crawford State Park, and Perry State Park.

Look for the Right Habitat

Morel mushrooms tend to grow in specific habitats, so it’s important to know what to look for. Morels like moist soil that is rich in organic matter, so look for areas with lots of leaves, grass, and other plant debris. You should also look for areas with plenty of shade and moisture, such as near streams, rivers, and lakes.

Check the Soil Temperature

Morel mushrooms grow best when the soil temperature is between 50-60 degrees Fahrenheit, so it’s important to keep an eye on the temperature. You can check the soil temperature using a soil thermometer, or by simply feeling the soil with your hand. If the soil is too cold, the mushrooms won’t grow, so it’s best to wait until the soil warms up before going mushroom hunting.

Use Your Senses

Finding morel mushrooms is not just about looking for them; it’s also about using your senses. Morels have a distinct smell that is often described as earthy or nutty. You can also use your sense of touch to find morels, as they have a unique texture that feels meaty and spongy. Additionally, morel mushrooms are often found near trees, so keep an eye out for areas where there are lots of fallen branches and leaves.

Know What to Look For

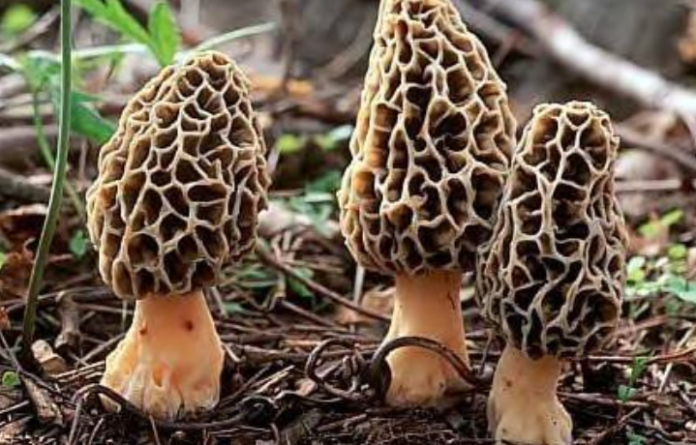
When searching for morel mushrooms, it’s important to know what they look like. Morels have a distinctive shape that is often described as being similar to a honeycomb. They have a cone-shaped cap that is covered in pits and ridges, and a stem that is attached to the cap at the bottom. The cap of the mushroom is usually brown or tan, while the stem is white or cream-colored.

Be Patient and Persistent

Mushroom hunting can be a frustrating hobby, as morel mushrooms can be difficult to find. However, it’s important to be patient and persistent. Keep looking for morel mushrooms in different locations and habitats, and don’t give up if you don’t find any right away. Remember, the thrill of finding a rare morel mushroom is well worth the effort!

Follow Local Regulations

Before you go mushroom hunting in Kansas, it’s important to check the local regulations. Some state parks and wildlife areas may have specific rules regarding mushroom hunting, so be sure

In conclusion, mushroom hunting is a fun and rewarding activity that can be enjoyed by anyone with an interest in nature. Finding morel mushrooms in Kansas requires knowledge of when to go hunting, where to look for them, what to look for, and how to use your senses.

By following these tips, you’ll increase your chances of finding these prized mushrooms and enjoying the unique flavor they offer. Remember to always follow local regulations and be patient and persistent in your search. Happy hunting!

How To Make Mushroom Grain Spawn

0

By producing your own grain spawn, you can cultivate virtually any type of mushroom. The process isn’t as complex as it may seem. In this article, I show you step-by-step How to make mushroom grain spawn at home without the need to buy it.

You won’t need to dedicate a lot of space or money to creating a mushroom lab.
However, you will require some equipment, such as a pressure cooker or pressure canner, but not a laminar flow hood, which is often the most daunting obstacle for novice growers.
You can make the grain spawn without the use of a laminar flow hood.

In fact, you can inoculate it in the open air without having to take too many special precautions. The trick to being able to do that has to do with this specially constructed lid that contains something called a self-healing injection port.

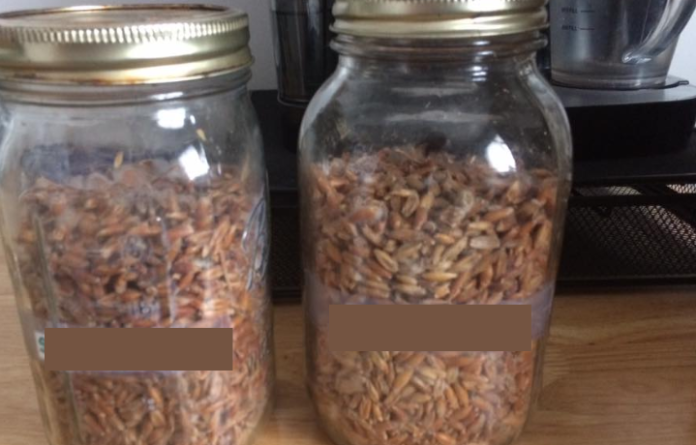
It’s super easy to make, and it makes the process of making your own grain spawn really easy. So the basic process for making your spawn is to take a cereal grain like rye or wheat berries, soak them overnight, and then simmer them on a stove before filling them up into these jars with these specially constructed lids.

To produce grain spawn, start by taking cereal grains such as rye berries, which are ideal for cultivating mushrooms. You may also use wheat berries or brown rice. Soak the grain in a bucket of water for 12 to 24 hours, allowing it to absorb the moisture that the mycelium will require to grow.

Afterward, drain the grain and transfer it to a glass jar with a self-healing injection port. Pressure sterilize the jar for about 90 minutes at 15 psi. Once sterilized, use a liquid culture syringe to inoculate the grain through the injection port. After a few weeks, you’ll have some ready-to-use grain spawn for your mushroom project.

Now, you don’t want to soak it for too much longer than 12 or 24 hours, because eventually, the grains will sprout. And you want to get your grains fully hydrated, but you don’t want them to sprout.

In a previous article, I demonstrated how to add coffee, gypsum, and other ingredients to a bucket while it’s soaking. However, this step is not necessary, particularly if you’re only growing on a small scale. Simply add water and let the grains soak. Keep in mind that the grains will absorb a significant amount of water while soaking, resulting in a hydrated volume that is typically three to three and a half times greater than the dry volume of the grains.

To produce 10-quart jars of grain spawn, you’ll need approximately 3 to 3 and a third-quart jars of dried grain. Measure out about 3 and a-third to 3.5-quart jars of dry grain, place it in a bucket, and soak it. This will provide enough grain for about 10 jars of grain spawn when everything is fully hydrated.

How To Make Self-healing Injection Port Lids

While the grain is soaking, it’s a perfect time to create specialized lids that will enable you to inoculate your sterilized grain without opening the jar. These lids are straightforward to make and eliminate the need for a laminar flow hood.

To create them, drill two holes in a standard jar lid: one larger quarter-inch hole for stuffing a wad of pillow stuffing to create a filter that allows mycelium to breathe as it grows through the sterilized grain, and another smaller 8-inch hole that you cover with a small dab of high-temperature silicone.

Allow the dab of silicone to dry overnight, and it will create a self-healing injection port. You can then inoculate your liquid culture directly through the dab of silicone without opening the jar.

When you inject your liquid culture through the self-healing injection port, the hole closes up immediately, preventing any contaminants from entering. This is why you can inoculate your jars in an open-air environment without requiring a laminar flow hood.

Creating these lids is straightforward, as all you need are your jar lids, pillow stuffing, and high-temperature silicone. However, be sure to use high-temperature silicone, as regular silicone sealant will melt in the pressure cooker. High-temperature silicone is resistant to high temperatures and will not melt during the sterilization process.

How To Make Mushroom Grain Spawn

Once your jars and lids are ready, and your grain has soaked for 12 to 24 hours, it’s time to simmer the grain on the stove. This step ensures that the grains are fully hydrated and softened, making it easier for the mycelium to grow on them.

To do this, simply put your soaked grain on the stove and simmer it for around 15 minutes. Be careful not to boil it too hard or for too long, as this can cause the grains to crack open, resulting in mushy and ineffective spawn.

Once the grains are drained, you can go ahead and fill your jars with the grains, leaving about an inch of headspace at the top. You want to make sure that you don’t pack the grains too tightly into the jars, as this can lead to insufficient airflow and cause problems with the growth of your mycelium.

After filling your jars with the grains, you can put on the specialized lids that you made earlier. You want to make sure that the filter is facing up and the injection port is facing down. Then tighten the lids, but not too tight, as you want to allow some air to escape during the sterilization process.

Now, you’re ready to sterilize your jars. You want to place them in a pressure cooker and sterilize them for about 90 minutes at 15 psi. Once the sterilization process is complete, allow the jars to cool down before inoculating them with your liquid culture syringe.

Inoculating Grain Jars With Liquid Culture

To inoculate the jars, simply remove the tape covering the injection port and sterilize the needle with a flame or alcohol. Then insert the needle into the silicone port and inject your liquid culture into the jar. Once you’re finished inoculating, cover the injection port with a new piece of tape and store the jars in a warm, dark place for a couple of weeks.

After a couple of weeks, you should see white mycelium growing throughout the grains in the jars. At this point, you can use the grain spawn to inoculate your bulk substrate or other jars for further growth. And there you have it, a simple method for making grain spawn at home for your mushroom-growing projects.

EASY WAYS TO GROW MUSHROOMS AT HOME

0
grow mushrooms at home

There are a variety of ways to grow mushrooms at home, ranging from simple techniques that require no special tools or equipment, to more advanced methods that may yield better results but require a greater investment.

The best part however is that no matter where you start, there’s no limit to how deep down the rabbit hole you want to go, growing mushrooms is really one of those hobbies where there’s always the opportunity to learn something new and to do something new.

So in this blog post, I wanted to give you a broad overview of the different ways you can get started growing mushrooms at home, so you can decide where to start and hopefully inspire you to start growing your own gourmet organic mushroom from the comfort of your home.

Mushroom Growing Kits

If you’ve never ever grown mushrooms before, then maybe the best way to start is from a mushroom growing kit. these mushroom growing kits allow you to grow fresh mushrooms with zero experience, and at the same time, they teach you what it is that mushrooms need to thrive.

Mushroom growing kits also help you understand a little bit about how mushroom lifecycle works. This way you can decide if growing mushrooms at home is something that’s worth your time without spending too much money getting started.

A mushroom growing kit is essentially a pre-colonized mushroom fruiting block that is prepared to yield mushrooms straight out of the box. Although they may be slightly smaller, they are fundamentally the same as the ones grown by commercial mushroom cultivators on a larger scale.

With a mushroom growing kit, the majority of the arduous work has already been accomplished for you, and all that is required is to remove it from the box, cut it open, maintain a humid environment, and provide optimal growing conditions for the mushrooms to flourish, resulting in a successful harvest.

The success of a kit like this relies heavily on your geographical location or climate. If you live in a highly humid area, growing the kit on your kitchen counter or any suitable location should pose no issue. However, in a dry climate, the mushrooms may not grow optimally or not at all if the block becomes too dry. As previously stated, mushrooms require high levels of humidity and fresh air to thrive.

If you are looking to create an optimal environment for mushroom fruiting, there is an effortless way to do so. A shotgun fruiting chamber can be used to maintain the required humidity and ensure adequate fresh air circulation. Essentially, it is a fruiting chamber that enables the cultivation of exquisite gourmet mushrooms.

Another method to achieve the same result is to follow a similar process by cutting a slit in the bag, and hydrating it, but instead of returning it to the box and placing it in your home, you can transfer it to a shotgun fruiting chamber.

Essentially, a clear container with a lid, where I have drilled quarter-inch holes across the top, sides, and bottom at two-inch intervals. I have also soaked some perlite, which is a mineral that gradually releases water, and filled the bottom few inches of the terrarium or fruiting chamber with it.

The perlite creates a favorable humid environment, while the holes provide ample fresh air exchange and light. So cut a slit in the fruiting block, soak it in water, then put it in this shotgun fruiting chamber. That provides the right conditions of humidity and fresh air to be able to grow some really nice gourmet mushrooms.

For the majority of individuals, leaving the kit on a counter and consistently spraying it to maintain the block and mushroom surfaces’ humidity will also result in successful growth. Growing mushroom kits are, by and large, the simplest method to commence growing mushrooms at home.

They are reasonably priced and can be purchased online, like the 3 Pack 130 Qt one I acquired from Amazon. There are several options and species to choose from, making it an effortless and convenient process.

Mushroom Growing Spawn

If you are comfortable with growing mushrooms from a kit and would like to explore further, the next level is to grow mushrooms from pre-made spawn. This option broadens your horizons as you are no longer restricted to the species available in a mushroom growing kit.

Commercial grain spawn comes in a vast range of species and enables you to grow mushrooms in various ways. Spawn can be likened to the seeds of mushrooms, although technically speaking, it is a sterilized grain that has been inoculated with mushroom culture.

The mycelium then spreads throughout the grain, creating individualized grains covered in the mushroom mycelium. This spawn can be incorporated into another substrate, where it will continue to grow and eventually produce mushrooms.

The fantastic aspect of mushroom grain spawn is that once it is fully colonized, it becomes relatively resistant to contamination. This is why you can opt for pre-made commercial grain spawn that has already been entirely colonized, allowing you to incorporate it into another substrate to grow your mushrooms without the worry of contamination.

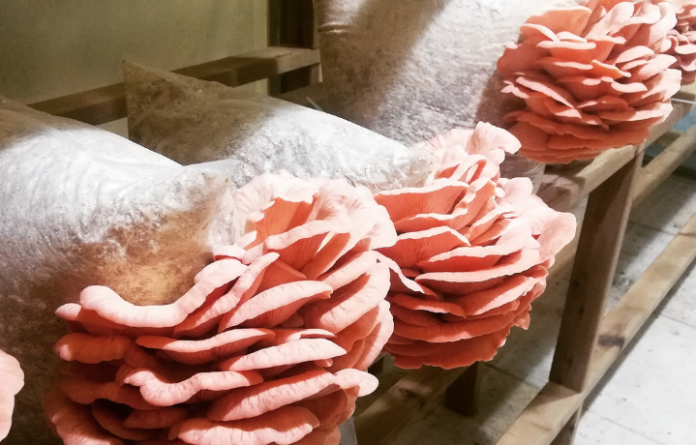
An alternative method for growing oyster mushrooms involves layering straw and grain spawn in a Nepali sheet-covered area of your backyard. This low-tech technique can yield a significant harvest over a couple of months.

There are numerous ways to use grain spawn to grow mushrooms, making it a convenient option for those starting out who wish to produce larger quantities of mushrooms than a kit would allow.

Once you’ve successfully grown mushrooms using pre-made spawn, consider delving further into mushroom cultivation by learning to manage cultures and create your own grain spawn. This will require specialized equipment such as a pressure cooker, pressure canner, autoclave, and possibly a laminar flow hood.

However, once you have a mushroom lab setup, the possibilities for managing cultures and creating fruiting blocks are endless. The world of mushroom cultivation is yours to explore!

THE 10 BEST INDOOR GROW TENTS

0

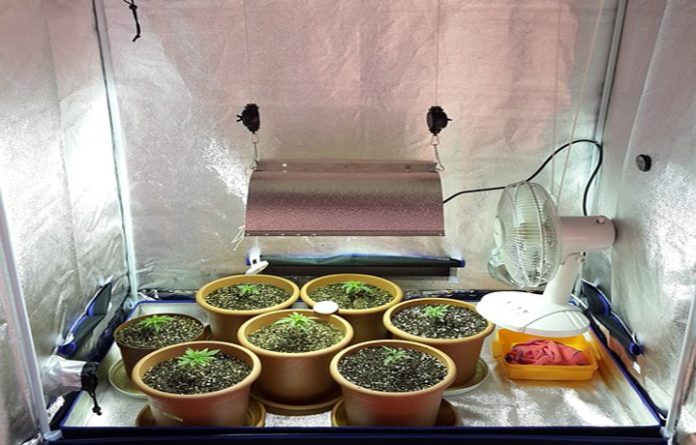
Hydroponic growing is an appealing option for those seeking a high level of control over their growing environment. However, achieving optimal growing conditions is impossible without a quality grow tent.

A grow tent is a crucial component of any successful hydroponic system, along with grow lights, ventilation, a hydroponic system, and nutrients. Without a quality grow tent, all other components become inconsequential.

A good grow tent provides the ability to easily control all necessary conditions, making it a versatile option for indoor and outdoor hydroponic plants. With a multitude of brands now offering high-quality, environmentally-controlled grow tents, choosing the right one can be overwhelming.

After extensive research and consultation with experts, we have compiled a list of the top 10 best indoor grow tents to aid you in selecting the perfect one for your needs. Without further delay, let’s jump right into our 10 best indoor grow tents.

Number 10: LAGarden 4×4 Grow Tent

This LAGarden 48″x48″x72″ Grow Tent is equipped with a slanted roof that provides ample space for a fan or filter. It creates a self-contained indoor growing space that is perfect for your plants throughout the year. It’s especially useful for growing plants in rooms with low ceilings, attics, apartments, and basements.

The tent’s 600D Oxford exterior is lightproof and blocks 98% of outside light, creating the ideal enclosed space. The Diamond aluminum film interior enhances the reflective effect and maintains the temperature, maximizing the efficiency of grow light and providing optimal lighting conditions for plant growth.

The tent’s ventilation system includes 6 dual-sleeved vents and 4 straps to install a fan, filter, or ducting for better air circulation. This system helps eliminate undesirable odors and brings in fresh air, making it suitable for LED, fluorescent, incandescent, or HID grow lights.

The tent’s metal frame is sturdy and has a load capacity of up to 55 lbs, making it strong enough to hold the grow light, filter, and ventilation fan. It’s easy to set up the frame by connecting tubes with connectors, and then install the cover in two simple steps. Additionally, it’s easy to dismantle for convenient storage when not in use.

The tent’s dual zippers make it easy to open and close the door, and the color of the string has been upgraded to ensure that the tent is lightproof. The tent also includes a 12″x12″ large window on the door and 2 rectangular mesh windows with hook and loop fasteners, which make it easy to observe plant growth without disturbing the inner environment. Check out the latest price here.>

Number 9: VIPARSPECTRA 4’x4′ Grow Tent

The Spider Farmer Pro-Grade 4×4 Grow Tent boasts an excellent design that includes heavy-duty zippers and double-stitched fabric to safeguard your growing space. It also features multiple round vents of different sizes to accommodate fans, filters, and ducting, and a rectangle window with mesh to keep dust and insects out, ensuring proper ventilation.

In addition, the tent is built to last, with strong metal poles and solid metal corner connectors that securely lock its frame in place.

The tent is completely lightproof and 100% reflective, thanks to its tear-proof Mylar material. Its waterproof floor comes with Velcro, providing extra protection for your plants.

Assembling and using the tent is incredibly easy, and it requires no tools. The zippers have also been updated, making it even easier to open and close.

Moreover, the tent comes with a worry-free 30-day money-back guarantee. If you have any questions or concerns, please contact us via Amazon message, and we will provide a satisfactory reply. Check out the latest price here.>

Number 8: Spider Farmer Pro-Grade 4×4 Grow Tent

If you’re looking for a hassle-free growing experience, the Spider Farmer Pro-Grade 4×4 Grow Tent is a fantastic choice. Constructed from 1680D Oxford canvas and Diamond reflective Mylar, this grow tent is both sturdy and lightweight. Its airflow design guarantees proper ventilation for your plants, promoting their growth and health.

Furthermore, the tent’s heavy-duty, hardened steel frame is powder-coated and capable of supporting up to 140lbs of growing equipment. Assembly is a breeze thanks to the tool-free design. Additionally, the tent’s 80-inch roof height makes it ideal for accommodating larger plants.

The Spider Farmer Pro-Grade 4×4 Grow Tent offers ample headroom, measuring at 6’7″. This makes it a great choice for tall indoor gardeners or for growing large plants. And the included instructions are straightforward and easy to follow, providing a welcome relief for those who struggle with complicated manuals.

Moreover, the tent’s inner lining is made of Oxford canvas and Diamond reflective Mylar, which not only adds durability but also enhances its reflectivity, making it an excellent option for efficient plant growth.

It’s worth noting that the door of the Spider Farmer Pro-Grade 4×4 Grow Tent is not held ajar by Velcro, but instead, there’s a piece of material to tie it back. While this may be a minor issue, it’s worth mentioning. Check out the latest price here>>

Number 7: Quictent Grow Tent

This tent excels at preventing any light leaks, thanks to its well-designed material that keeps the light in.

Additionally, the inclusion of an observation window is a significant advantage as it enables you to monitor your plants’ growth without disturbing the ideal environment. The Quictent Grow Tent provides great value for your money since it’s not only affordable but also performs as advertised.

Moreover, the two-year warranty covering the entire product gives you peace of mind, ensuring that you will have a compact grow tent if any part of it is found to be defective. Check out the latest price here.>>


Number 6: The iPower Grow Tent 

a budget-friendly option for indoor growing. This tent is tear-proof, wear-resistant, and waterproof, all thanks to the high-quality Oxford fabric used in its construction.

It effectively blocks light from escaping and has no air or light leaks, eliminating the need for additional flaps or tape to make it light-proof. The iPower Grow Tent is lined with 98% reflective mylar, which significantly boosts the output efficiency of your growing setup. Featuring heavy-duty zippers and double stitching, this tent ensures durability and longevity.

The sturdy metal poles and corners provide ample support for the frame, which can hold up to 110 pounds of equipment. Installing the sturdy frame is also a breeze. The iPower Grow Tent features an easy-access door, zip observation windows, a tool bag, metal poles, metal connectors, and a removable floor tray for enhanced growing convenience.

Moreover, the included user manual makes it easy for beginners to install and start growing their plants in a controlled environment, even in small spaces. Check out the latest price here.>>


At number 5: CoolGrows Grow Tent 

an excellent option for indoor gardening. Equipped with high-quality observation windows, this tent allows you to monitor your plant’s growth status without disrupting the environment.

The tent’s 95% reflective lining further enhances your indoor gardening light fixtures by increasing the grow light’s intensity and dispersion. The CoolGrows hydroponic grow room boasts a removable waterproof floor tray for hard soil, making it easy to remove for washing.

With heavy-duty zippers and sturdy construction, thanks to double stitching and metal poles, this tent guarantees stability. The 600D thick tent fabric ensures that this grow tent is highly durable and long-lasting.

The CoolGrows Grow Tent includes a user manual for easy assembly and installation, and its observation window and zippers operate smoothly, making it a great addition to any indoor growing setup. Check out the latest price here.>>


At number 4: AC Infinity CLOUDLAB

An advanced grow tent that efficiently creates optimal environmental conditions for your plants. With a growing space of 26 by 26 by 72, this tent allows you to grow as many plants as you want in a limited space.

The AC Infinity CLOUDLAB 733 comes with additional accessories such as a removable tray, carrying case, and tool bag, making it a great value for money. This dynamic tent has taken the grow tent market by storm due to its durable frame, constructed from thick steel poles that support twice the weight capacity of a standard grow tent.

The high-density 2000D grow tent canvas efficiently prevents air and light leaks, while the diamond mylar reflective surface amplifies light reflectivity, centralizing it on your plants for even light distribution and better growth.

The inner ribbon stitching seals the tent corners, preventing light from escaping, and the observation windows allow you to monitor your plants’ progress without opening the zipper. Overall, the AC Infinity CLOUDLAB grow tent is a highly functional, compact tent that is affordable and perfect for any budget-conscious grower. Check out the latest price here.>>

Number 3: Mars Hydro Grow Tent

The Mars Hydro Grow Tent is the perfect balance between quality and price, and it takes the number three spot on our list. If you’re a beginner, this grow tent is perfect for you. It’s affordable and very easy to set up.

While there might be a small amount of light leakage through the zipper, this can be easily fixed by ironing the zipper covers on the inside. Despite being a budget tent, the Mars Hydro Grow Tent is surprisingly high quality.

It features a robust, heavy-duty zipper and a metal frame with metal corners, ensuring durability and longevity with diligent use. Additionally, it can handle heavy equipment like an LED grow light.

The grow tent also offers plenty of options for running ventilation, making it super easy to tailor to your specific setup. For beginners and anyone looking for a top value-for-money grow tent, the Mars Hydro Grow Tent is the one we recommend.

Number 2: Gorilla Grow Tent

Gorilla Grow Tent’s Lite Line offers top-quality grow tents at a premium price, but what many don’t know is that they also have a more affordable light line option that is only slightly lower in quality. Despite its lower fabric density, the Lite Line uses a durable PVE binding technique and boasts a taller height than most tents in its price range, which can even be extended with a height kit.

In addition to high-quality construction and a tool packet flood mat, the Lite Line also includes convenient extras such as easy view windows and diamond reflective walls that promote faster and stronger plant growth. While it may be less durable than the regular line, it’s still more durable than the average grow tent, thanks to its sturdy steel frame and heavy-duty zipper.

For those looking for a cost-effective option that doesn’t sacrifice quality, the Lite Line’s features and price make it a no-brainer purchase. However, for those seeking the highest quality tent possible, an upgrade to the standard Gorilla 2×2 may be necessary. Check out the latest price here.>


Number 1: VIVOSUN Mylar Hydroponic Grow Tent

The VIVOSUN Mylar Hydroponic Grow Tent is a new entrant in the grow tent market, but it has quickly gained a reputation for being a good value brand. Although the tent’s build quality is slightly better than that of the Mars Hydro grow tent, the latter is rated higher due to its longer track record and better reputation.

This tent is less expensive than premium brands like TopoLite and Gorilla, but it offers similar quality and conveniences, such as a heavy-duty zipper that won’t break easily, reliability and durability with a sturdy metal frame, metal corners, and thick canvas. The easy view window allows you to check on your plants easily, and the best part is that they offer a 2-year warranty, which is a lot for a budget grow tent and shows the trust they have in their craftsmanship.

This tent is also one of the easiest to set up and customize to your specific needs, thanks to its numerous vents and ports. If you’re looking for a durable and reliable grow tent while keeping costs relatively low, this is the best option for you. Nurturing young plants is challenging, and minor changes in temperature, moisture, and environment can cause them to wither and die. Hydroponic growing provides a high level of environmental control, and with the help of the best grow tent, you can adjust and control the plant’s growing conditions. Check out the latest price here.>

Grow tents are vital for excellent hydroponic systems because they offer flexibility to growers who lack soil space. However, choosing the best grow tent can be challenging when there are numerous models available on the market. With decent design and innovative features, all the products mentioned above provide a perfect blend of versatility and innovation, offering users the best experience possible. Choose wisely which product suits you the best and fulfills all your requirements.

HOW TO GROW MUSHROOMS

0

Mushrooms are a delicious and nutritious addition to any meal, and growing your own mushrooms at home can be a rewarding and satisfying experience. Whether you’re a seasoned gardener or just starting out, growing mushrooms is a fun and relatively easy project that can be done indoors or outdoors.

In this blog post, we’ll cover the basics of mushroom cultivation, including choosing the right species, preparing the growing medium, and maintaining the ideal growing conditions. By the end of this post, you’ll have all the information you need to start growing your own mushrooms and enjoying the taste of fresh, homegrown produce. So let’s dive in and learn how to grow mushrooms!

What conditions are needed for a mushroom to grow:

Mushrooms are fungi that grow in a variety of environments. However, there are some conditions that are necessary for their growth. Here are some of the most important conditions that are required for mushrooms to grow:

Temperature: Most mushrooms grow best in temperatures between 60 and 75 degrees Fahrenheit. Different species of mushrooms have different temperature preferences.

Humidity: Mushrooms need a humid environment to grow. The ideal humidity level for mushroom growth is between 80% and 95%.

Light: While mushrooms don’t need light to grow, they do need some light to initiate the formation of fruiting bodies.

Oxygen: Mushrooms need oxygen to grow, but too much or too little can affect their growth.

Nutrients: Mushrooms require a substrate to grow on, which provides them with the nutrients they need. The substrate can be anything from wood chips to compost to straw.

pH: Most mushrooms prefer a slightly acidic pH, between 5.0 and 6.5.

Cleanliness: It’s important to keep the growing environment clean and free from contaminants, which can inhibit mushroom growth or even kill the mushrooms.

These are some of the most important conditions that are necessary for mushroom growth. By providing the right environment, you can successfully grow mushrooms at home or in a commercial setting.

How long do mushrooms grow:

The time it takes for mushrooms to grow depends on several factors, including the species of mushroom, the growing conditions, and the stage of development at which the mushrooms are harvested. In general, however, the growth cycle of mushrooms can be broken down into four stages:

Spawn Run: During this stage, the mycelium (the vegetative part of the fungus) grows throughout the substrate.

Pinning: In this stage, small bumps called “pins” start to appear on the surface of the substrate. These are the beginnings of the fruiting bodies (the mushrooms themselves).

Fruiting: This is the stage where the mushrooms grow to full size. Depending on the species of mushroom and the growing conditions, this stage can take anywhere from a few days to several weeks.

Harvest: Once the mushrooms have reached the desired size, they can be harvested. Some mushrooms, such as oyster mushrooms, can be harvested multiple times over a period of several weeks.

In general, the entire growth cycle of mushrooms can take anywhere from 2 weeks to 2 months or more, depending on the factors mentioned above.

How to grow your own mushrooms without a kit:

Growing mushrooms without a kit can be a fun and rewarding experience, but it requires some patience and attention to detail. Make sure to research the specific requirements for the species you want to grow and follow proper sterilization procedures to avoid contamination. And you can grow mushrooms without a kit by following these steps:

Choose a mushroom species to grow: There are many different species of mushrooms that can be grown at home, but some are easier to cultivate than others. For beginners, oyster mushrooms are a good choice, as they are relatively easy to grow and have a short growing cycle.

Prepare the substrate: Mushrooms grow on a substrate, which is the material that the mycelium will feed on. Different mushroom species have different substrate requirements, but some common substrates include straw, sawdust, and coffee grounds. Sterilize the substrate to kill any contaminants.

Inoculate the substrate: Inoculation is the process of introducing the mycelium to the substrate. This can be done using spores, a liquid culture, or a colonized piece of agar. Make sure to keep everything sterile to prevent contamination.

Incubate the substrate: After inoculation, the substrate needs to be incubated in a warm, dark place to allow the mycelium to grow. This can take anywhere from a few days to several weeks, depending on the species and the temperature.

Allow for fruiting: Once the mycelium has fully colonized the substrate, it’s time to initiate fruiting. This can be done by exposing the substrate to fresh air, light, and lower temperatures.

Harvest the mushrooms: As the mushrooms grow, harvest them by gently twisting them off the substrate. Make sure to harvest them before the caps start to flatten out.

How to grow mushrooms indoor:

Growing mushrooms indoors is a great way to have a fresh supply of mushrooms year-round. Here are the general steps to grow mushrooms indoors:

Choose a mushroom species: Choose a species of mushroom that is easy to grow indoors, such as oyster mushrooms, shiitake mushrooms, or white button mushrooms.

Decide on a growing medium: Mushrooms can be grown on a variety of materials, including sawdust, straw, coffee grounds, and even old books. Choose a medium that is easy to sterilize and readily available.

Sterilize the growing medium: Sterilize the growing medium by boiling or pressure cooking it for at least 1 hour. This kills any bacteria or other microorganisms that could compete with the mushrooms.

Inoculate the growing medium: Once the growing medium has cooled, inoculate it with mushroom spawn or spores. This can be done using a syringe, or by mixing the spawn with the growing medium.

Maintain temperature and humidity: Mushrooms require a warm and humid environment to grow. The ideal temperature range is between 65-75°F (18-24°C), and the humidity should be around 90%.

Provide proper lighting: While mushrooms do not require light to grow, providing some light can help stimulate their growth. A fluorescent or LED light can be used.

Wait for the mushrooms to grow: After inoculation, it can take anywhere from a few days to several weeks for the mushrooms to start growing. Make sure to maintain proper temperature, humidity, and lighting conditions during this time.

Harvest the mushrooms: Once the mushrooms have fully matured, harvest them by gently twisting them off the growing medium. Cut off any remaining stem from the growing medium to prevent contamination.

Finally, growing mushrooms can be a fun and rewarding experience that allows you to enjoy the taste of fresh, homegrown produce. Whether you’re a beginner or an experienced gardener, there are many different mushroom species and growing techniques to explore.

One of the great things about growing mushrooms is that it can be done indoors or outdoors, and with a variety of different growing media. From straw and sawdust to coffee grounds and even old books, there are many materials that can be used as a substrate for mushroom cultivation.

However, as with any gardening project, there are some important things to keep in mind when growing mushrooms. Maintaining the right temperature, humidity, and lighting conditions is crucial for success, as is keeping the growing environment clean and free from contaminants.

With that said, don’t be discouraged if you encounter some setbacks or challenges along the way. Growing mushrooms is a learning process, and with each attempt, you’ll gain more knowledge and experience to help you succeed in the future.

In the end, growing your own mushrooms is a satisfying and sustainable way to enjoy this delicious and nutritious food. Not only can you save money and reduce your environmental footprint, but you’ll also have the satisfaction of knowing that you grew the mushrooms yourself. So why not give it a try and see what you can grow?


THE ART OF MUSHROOM GROWING

0

Mushroom growing is a rewarding hobby that allows you to produce your own fresh mushrooms at home. There are many different types of mushrooms that can be grown, including popular varieties such as shiitake, oyster, and lion’s mane.

To start growing mushrooms, you will need to obtain some mushroom spores or spawn. This can be purchased from a mushroom farm or online retailer. Once you have your spores or spawn, you will need to decide on the type of medium you want to use for growing your mushrooms. Some options include straw, wood chips, or a pre-packaged mushroom growing kit.

Once you have your spores and medium, it’s time to prepare your growing area. Mushrooms prefer a dark, humid environment with a temperature between 55 and 75 degrees Fahrenheit. You can create this environment in a basement, closet, or spare room by installing a humidity control system and a heating pad or mat to regulate the temperature.

Once your growing area is set up, you can begin the process of inoculating your medium with the spores or spawn. This is typically done by sprinkling the spores over the surface of the medium and then misting them with water. You will need to keep the medium moist, but not waterlogged, and monitor the temperature and humidity levels to ensure optimal growing conditions.

As the mushrooms begin to grow, you will need to provide them with proper nutrition and care. This can be done by misting them with a nutrient-rich solution and keeping the growing area clean and free of debris.

With proper care and attention, your mushrooms should begin to fruit within a few weeks or months, depending on the type of mushroom you are growing. Once they are fully mature, you can harvest them and enjoy them fresh or preserve them for later use by drying or freezing.

Overall, mushroom growing is a fun and rewarding hobby that allows you to produce your own delicious mushrooms at home. With a little bit of patience and attention to detail, you can enjoy the fruits of your labor and savor the taste of homegrown mushrooms.

Whether you are an experienced gardener or a complete novice, mushroom growing is an enjoyable and accessible activity that anyone can enjoy.

There are many different types of mushrooms that can be grown at home, each with its own unique flavor and texture. Some popular varieties include shiitake, oyster, lion’s mane, and maitake. No matter which type of mushroom you choose to grow, the process is generally the same.

To get started, you will need to obtain some mushroom spores or spawn. This can be purchased from a mushroom farm or online retailer. Once you have your spores or spawn, you will need to decide on the type of medium you want to use for growing your mushrooms. Some options include straw, wood chips, or a pre-packaged mushroom growing kit.

Once you have your spores and medium, it’s time to prepare your growing area. Mushrooms prefer a dark, humid environment with a temperature between 55 and 75 degrees Fahrenheit. You can create this environment in a basement, closet, or spare room by installing a humidity control system and a heating pad or mat to regulate the temperature.

Once your growing area is set up, you can begin the process of inoculating your medium with the spores or spawn. This is typically done by sprinkling the spores over the surface of the medium and then misting them with water. You will need to keep the medium moist, but not waterlogged, and monitor the temperature and humidity levels to ensure optimal growing conditions.

As the mushrooms begin to grow, you will need to provide them with proper nutrition and care. This can be done by misting them with a nutrient-rich solution and keeping the growing area clean and free of debris. It’s also important to provide your mushrooms with adequate ventilation to prevent the growth of mold or bacteria.

As your mushrooms continue to grow and mature, you will need to monitor their progress and make any necessary adjustments to the growing conditions. This may include adjusting the temperature, humidity, or nutrient levels to ensure that your mushrooms are receiving everything they need to thrive.

Once your mushrooms are fully mature, you can harvest them and enjoy them fresh or preserve them for later use by drying or freezing. Whether you choose to sauté them in butter, toss them in a salad, or use them in a savory soup, homegrown mushrooms are a delicious and nutritious addition to any meal.

Overall, mushroom growing is a fun and rewarding hobby that allows you to produce your own fresh mushrooms right at home. With a little bit of patience and attention to detail, you can enjoy the fruits of your labor and savor the taste of homegrown mushrooms.

There are many different types of mushrooms that can be grown at home, each with its own unique flavor and texture. Some popular varieties include shiitake, oyster, lion’s mane, and maitake. No matter which type of mushroom you choose to grow, the process is generally the same.

To get started, you will need to obtain some mushroom spores or spawn. This can be purchased from a mushroom farm or online retailer. The type of spores or spawn you choose will depend on the type of mushroom you want to grow. For example, if you want to grow shiitake mushrooms, you will need to purchase shiitake spores or spawn.

Once you have your spores or spawn, you will need to decide on the type of medium you want to use for growing your mushrooms. Some options include straw, wood chips, or a pre-packaged mushroom growing kit. The type of medium you choose will depend on the type of mushroom you are growing and the resources available to you.

Once you have your spores and medium, it’s time to prepare your growing area. Mushrooms prefer a dark, humid environment with a temperature between 55 and 75 degrees Fahrenheit. You can create this environment in a basement, closet, or spare room by installing a humidity control system and a heating pad or mat to regulate the temperature.

Once your growing area is set up, you can begin the process of inoculating your medium with the spores or spawn. This is typically done by sprinkling the spores over the surface of the medium and then misting them with water. You will need to keep the medium moist, but not waterlogged, and monitor the temperature and humidity levels to ensure optimal growing conditions.

As the mushrooms begin to grow, you will need to provide them with proper nutrition and care. This can be done by misting them with a nutrient-rich solution and keeping the growing area clean and free of debris. It’s also important to provide your mushrooms with adequate ventilation to prevent the growth of mold or bacteria.

As your mushrooms continue to grow and mature, you will need to monitor their progress and make any necessary adjustments to the growing conditions. This may include adjusting the temperature, humidity, or nutrient levels to ensure that your mushrooms are receiving everything they need to thrive.

Once your mushrooms are fully mature, you can harvest them and enjoy them fresh or preserve them for later use by drying or freezing. Whether you choose to sauté them in butter, toss them in a salad, or use them in a savory soup, homegrown mushrooms are a delicious and nutritious addition to any meal.

In addition to the basic steps outlined above, there are several additional tips and techniques that can help you succeed in mushroom growing. For example, it’s important to choose the right location for your mushroom growing operation. Mushrooms prefer a dark, humid environment with a consistent temperature, so it’s important to choose a location that meets these requirements.

It’s also important to choose the right type of spores or spawn for your growing medium. Different types of mushrooms have different requirements for spores or spawn, and it’s important to choose a type that is compatible with your chosen medium.

Finally, it’s important to be patient and persistent when growing mushrooms. Mushroom growing can be a slow and delicate process, and it may take several weeks or months before your mushrooms are ready to harvest. With patience

A step by step guide to mushroom growing

0

Mushroom growing is very easy if you know exactly what you’re doing, and it’s not difficult to learn the different steps involved in the process. Now, the basics of preparing growth medium and containers has been covered elsewhere, but the actual basics of how to plant and care for mushrooms will be covered in detail in the course of this article.

You will most likely buy mushroom spores or spawn when you first learn to grow mushrooms, and before you learn to harvest the spores from mushroom caps for yourself. Now, there are two types of this spawn available. It is available in flakes, but it is also available in bricks as well. How you plant the spores or spawn depends on what sort that you buy. I would suggest, if you’re thinking of planting mushrooms regularly, that you buy and plant both types, and see what works better for you.

If you buy and plant both types, there are very different methods of planting them. The bricks need to be broken into chunks, each about one inch in diameter. These chunks are put into the growing medium, spaced about half a food from each other. You need to make holes about an inch or two deep before you put these chunks in. Flakes are mixed right into the growth medium. Take about a quart of these flakes and spread them over fifteen square feet, and continue until you have the growth medium evenly covered. You need to mix these into the growth medium while doing this.

Make sure that the flakes are not visible on the surface of the growth medium. Whether you use chunks or flakes, the next steps to mushroom growing are the same. You spray a mist of water on to the mixture regularly, and keep it in the dark. Soon the mushroom spawn will begin to put out mycelia, which are the fungal version of roots. Once these are out, the mushrooms will really start to grow. As a matter of fact, in time you will see an intricate web of these pale white mycelia form.

Slightly increasing the temperature to about sixty-five degrees Fahrenheit at this time will encourage growth. Remember to water daily. In a few weeks, you should be able to see the mushrooms. You should not water in the period between when the mushrooms appear and the harvest. You can harvest mushrooms when they are either very small or when they mature. Just use a sharp knife to harvest each mature mushroom, and there’ll soon be another mushroom growing in its place.